


![Sophomore Lily Bell posing as a player in the senior assassin game. Seniors participating in the game eliminate others by squirting them with a water gun, and can wear goggles for immunity against others. “People did have to go out and buy [water] guns, but most people have the googles at home, but you don’t even have to use a gun, you can use water of any sort,” senior Gwyn Christensen said.](https://ahstalonnews.com/wp-content/uploads/2026/05/unnamed-1-1-900x1200.jpg)

![The shadows against a captivating blue are a nod to the “Catch Me If You Can” musical poster, both for this performance and the blue from the Broadway show. The detectives in this scene are at shooting practice, in preparation for when they finally encounter Frank Abagnale Jr. “We always say our motto is ‘theater is a team sport,’ and really just emphasizing to our students that everyone is welcome in the drama department. There's always a role for you, whether or not, on stage or behind the scenes, in the costume shop, in the scene shop. [There are] all sorts of different things that go into bringing a show to life. So we love our drama hawks and welcome everyone to drama,” Drama Director Mollie Jo Blahunka said.](https://ahstalonnews.com/wp-content/uploads/2026/04/cmiyc-1200x800.jpg)

![Henry, Emily (2021). People we meet on vacation [Book cover]. Berkley Books. Image used under fair use for purposes of commentary and review. Haley, Brett (2026). People we meet on vacation [Movie poster]. Movie poster courtesy of 3000 Pictures and Temple Hill Entertainment. Made by Adilyn Hoop using Canva.](https://ahstalonnews.com/wp-content/uploads/2026/01/vacay1.png)


![Lockhart, E. (2025). We fell apart [Book cover]. Delacorte Press. Image used under fair use for purposes of commentary and review. The newest book in the “We were liars” collection was released Nov. 4.](https://ahstalonnews.com/wp-content/uploads/2025/11/wefell1.png)


![A Group of PEOPEL PE students and helpers set up an obstacle course during class. The “Amazing Race” unit had started in PEOPEL PE where the students and helpers got to compete in a variety of different activities and games. “We try our best to make [inclusion] a school-wide event, but it's just so much more different when you actually engage with the students hands-on and actually get to know them as people.” Sophomore Bree Christensen said. Photo Taken by Ada McNulty.](https://ahstalonnews.com/wp-content/uploads/2026/05/unnamed-12-1200x900.jpg)


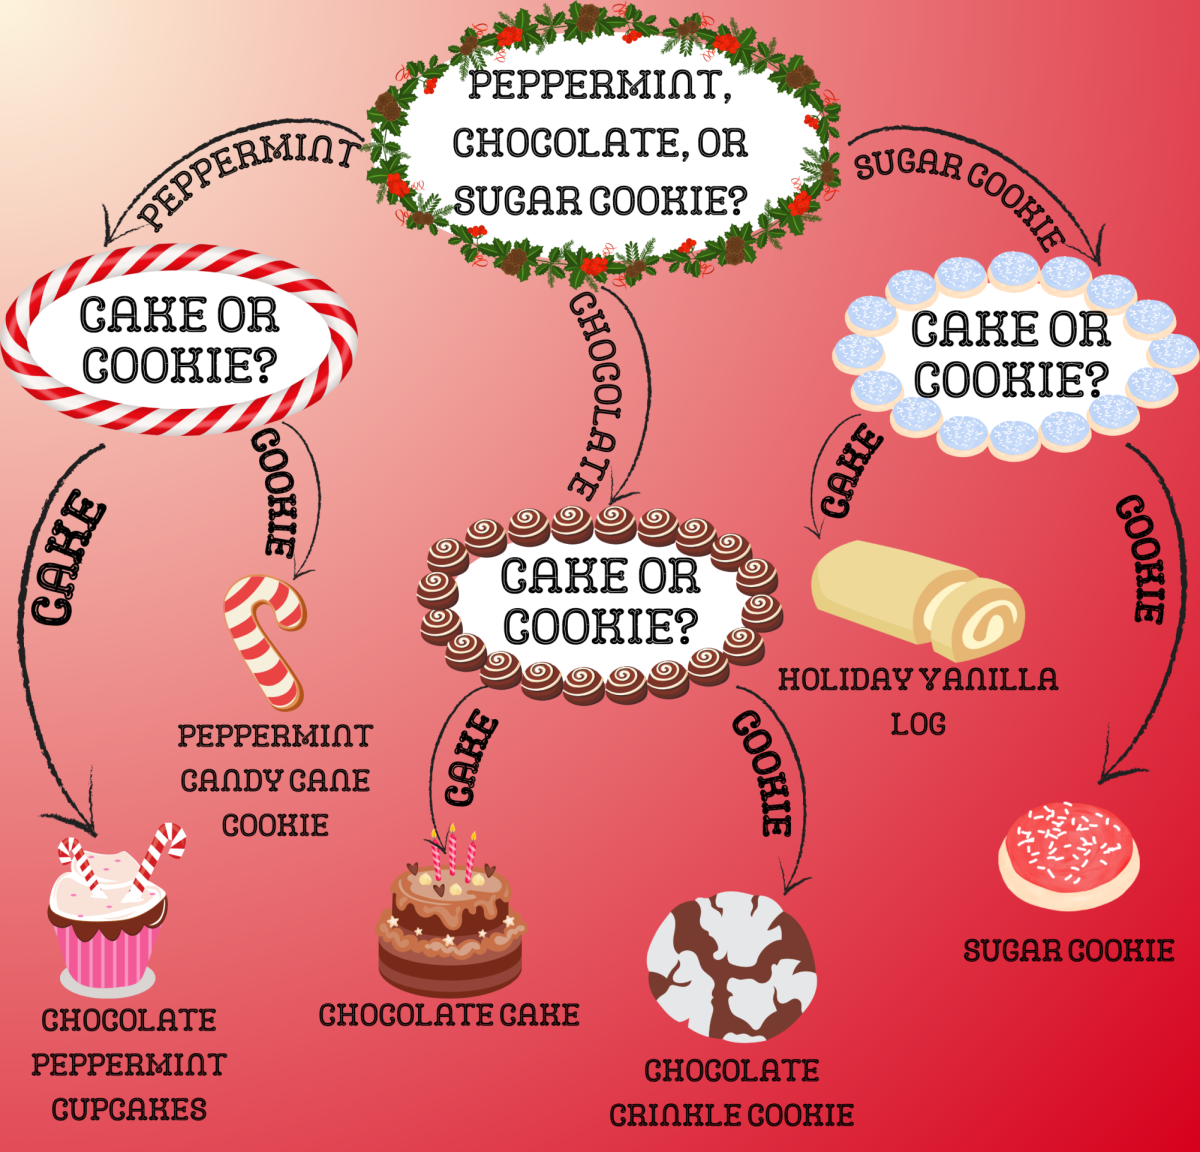
Chocolate Peppermint Cupcakes:
Ingredients:
Dark Chocolate Cupcakes:
¼ cup semisweet chocolate chips
¼ cup black cocoa powder substitute with dark or regular cocoa powder
¾ cup boiling water
¾ cup all-purpose flour
¾ cup granulated sugar
½ tsp baking soda
½ tsp salt
⅓ cup vegetable oil
2 eggs room temperature
1 tsp vanilla extract
Peppermint Buttercream Frosting:
1 cup unsalted butter room temperature
2 ½ cups powdered sugar
1 tsp peppermint extract
1 tsp vanilla extract
½ tsp salt
2 tbsp heavy cream
Additional Ingredients:
¼ cup peppermint sprinkles substitute crushed candy canes
12 mini candy canes
Dark Chocolate Cupcakes:
- Preheat the oven to 350° F. Line a cupcake pan with 12 cupcake liners.
- In a mixing bowl, stir together the semisweet chocolate chips, black cocoa powder, and boiling water until the cocoa powder is dissolved and the chocolate is melted. Set aside to cool slightly.
- In a large mixing bowl, whisk together the all-purpose flour, granulated sugar, baking soda, and salt. Pour the chocolate mixture into the dry ingredients and whisk until combined. Add the vegetable oil, eggs, and vanilla extract. Whisk until combined and smooth.
- Portion the cupcake batter into the cupcake liners about ⅔ full. Bake the cupcakes for 20 minutes or until the tops of the cupcakes bounce back slightly when touched. Remove the cupcakes from the oven and cool in the pan for 5 minutes. Transfer the cupcakes to a wire cooling rack to cool completely.
Peppermint Buttercream Frosting
- In the bowl of a stand mixer fitted with a paddle attachment or in a large bowl with an electric hand mixer, whip the unsalted butter on medium-high speed for 5 minutes until it is light, pale, and creamy.
- Add in the powdered sugar and mix on low speed until combined. Add the peppermint extract, vanilla extract, and salt. While mixing on low speed, drizzle in the heavy cream.
- Turn the speed on the mixer to medium and whip the frosting for 2 to 3 minutes, scraping the sides and bottom of the bowl occasionally, until the frosting is smooth and creamy.
Assembling the Cupcakes
- Fill a piping bag fitted with an Ateco 857 piping tip with the peppermint buttercream frosting. Pipe an “ice cream swirl” of buttercream onto the cupcakes. Sprinkle the cupcakes with peppermint sprinkles or crushed candy canes and decorate with mini candy canes.
Peppermint Candy Cane Cookies:
Ingredients:
- 2 sticks (227g) unsalted butter, at room temperature
- 1 cup (200g) sugar
- 1 1/2 tsp peppermint extract
- 1 tsp vanilla extract
- 1 tsp baking powder
- 1/2 tsp kosher salt
- 1 large egg
- 2 3/4 cup (385g) all-purpose flour
- 1 tsp liquid red food coloring
To finish:
- 1 egg white
- 2 tbsp sparkling sugar
To Make:
- Make the dough:
- Place the butter, sugar, peppermint, vanilla, baking powder, and salt in the bowl of a stand mixer (if you don’t have a stand mixer, you can use an electric mixer and a bowl). Beat until a paste forms and clings to the side of the bowl.
- Scrape down the side of the bowl and beat in the egg until it is absorbed. Add the
- flour and beat until just combined and no more dry streaks of flour remain.
- Color half the dough:
- Divide and remove half the dough from the bowl. Carefully add the red food coloring to the remaining dough. Mix on low until the color is evenly distributed.
- Chill the dough:
- Pat each piece of dough into a disk, wrap in plastic wrap, and refrigerate for at least 3 hours or overnight.
- When ready to bake, preheat the oven to 350ºF:
- Line a baking sheet with parchment paper or a silicon baking mat.
- Shape the cookies:
- The chilled dough should be firm, but still easy to shape straight from the fridge. If not, let it warm for just a few minutes until malleable. Don’t let it warm too much or it will be too soft to work with again.
- Pinch off a 1-inch round piece of the white dough and roll it out to a 5-inch rope. Do the same with a piece of the red dough (make sure the ropes are the same length).
- Place the ropes next to each other and twist together. Transfer to the baking sheet and curve the top of the dough into a candy cane shape.
- Repeat with the remaining dough, spacing the cookies about 2 inches apart.
- Top the cookies with sparkling sugar:
- Make the egg white wash by beating the egg white with 1 tablespoon of water until foamy. Brush the top of each cookie with the egg white wash and then sprinkle with the sugar.
- Bake the cookies:
- Bake in the oven for 8 to 10 minutes or until the edges are just barely brown. Let cool on the baking sheet for 10 minutes before moving to a wire cooling rack.
Chocolate Cake:
Ingredients:
- ⅔ cup flour
- ½ tsp baking powder
- ½ tsp salt
- 5 eggs
- ¾ cup sugar
- 2 oz unsweetened Baker’s chocolate
- ¼ cup cold water
- 2 tbsp sugar
- ¼ tsp baking soda
How to Make:
- Mix flour, baking powder and salt in a bowl.
- Beat eggs in a separate bowl.
- Gradually beat in ¾ cup sugar; beat until fluffy and light in color
- Gradually fold in flour mixture
- In a saucepan, melt chocolate over low heat, stirring constantly until smooth. Immediately add water, 2 tablespoons sugar and baking soda. Stir until thick and smooth.
- Blend quickly into batter.
- Preheat the oven to 350o Fahrenheit.
- Grease a 15×10 inch pan and then line with parchment paper and grease again.
- Pour batter into the prepared pan and place in the oven for 18-20 minutes, or until a cake tester inserted into the center comes out clean.
Chocolate Crinkle Cookies:
Ingredients:
- ½ cup vegetable oil
- 4 oz unsweetened Baker’s chocolate (bar form), melted.
- 2 cups granulated sugar
- 4 eggs
- 2 tsp vanilla extract
- 2 cups, all-purpose flour, sifted.
- 2 tsp baking powder
- ½ tsp salt
- 1 cup powdered sugar
How to Make:
- Mix oil, melted chocolate, and sugar in a large bowl.
- Blend in eggs one at a time, until well-mixed.
- Add vanilla extract.
- Stir in flour, baking powder, and salt into the oil mixture.
- Chill for several hours or overnight. (Can chill for 90 minutes if needed)
- Preheat the oven to 350o Fahrenheit.
- Drop teaspoons of dough into a bowl of sifted powdered sugar.
- Roll in the powdered sugar until completely coated and roll into a ball.
- Place on a baking sheet, approximately 2 inches apart and place into the oven. Bake for 10-12 minutes, or until done.
Ingredients:
Cake:
- 2 eggs
- 3 egg yolks
- 1/2 cup (100 grams) sugar
- 1 teaspoon vanilla extract
- 1/3 cup (30 grams) cake flour, sifted
- 3 tablespoons (30 grams) cornstarch
- 1/4 cup red & green Wilton batter bits (found at WalMart)
- 2 egg whites
- 1 tablespoon sugar
Vanilla Buttercream:
- 1 cup butter, room temperature
- 3 cups (360 grams) powdered sugar
- 3 to 4 tablespoons red and green sprinkles
- 1 teaspoon vanilla extract
- 1 to 3 teaspoons heavy cream
Decorations:
- 4 ounces white chocolate
- Red and green sprinkles
How to Make:
Cake:
- Heat the oven to 450°F. Line a 17X12-inch jelly pan with parchment paper. Set aside.
- In a mixing bowl add the 2 eggs, 3 egg yolks and 1/2 cup sugar. With the paddle attachment on, beat on medium to high speed 3-5 minutes until pale in color and thickened. Add the vanilla extract and beat for a few more seconds.
- Sift the flour and the cornstarch over the egg yolks mixture and with a spatula gently fold it in. Fold in the batter bits as well.
- In a separate grease free bowl, add the 2 egg whites and 1 tablespoon of sugar. With a whisk, whip until firm peaks form. With the spatula, fold the whipped egg whites into the egg yolks mixture.
- Pour the cake batter into the prepared pan, spread it evenly and bake for 6-7 minutes until golden brown and, when touched, it springs back.
- As soon as you remove the cake from the oven sprinkle with powdered sugar and then invert the cake onto a clean dish towel. Remove the parchment paper, sprinkle with more powder sugar, and roll up the cake with the towel. Place on a wire rack to cool
Vanilla Buttercream:
- In a clean bowl add the butter.
- With the whisk attached to the mixer, whip the butter for 2-3 minutes on medium to high speed.
- Lower the speed and slowly add the sugar, 1/2 cup at a time.
- When all the sugar is incorporated, increase the speed and whip for 2 more minutes.
- Add a few drops of heavy cream until it reaches the consistency you desire.
- With a spatula fold in the sprinkles.
Assembling the Log:
- Gently unroll the cake and spread the buttercream evenly all over it. Roll it again and place in the fridge for a couple of hours.
- To decorate, melt the white chocolate in a double boiler or microwave and pour it over the cake. Add more sprinkles if desired.
Ingredients:
Cookies:
- 2 and 1/4 cups (281g) all-purpose flour (spooned and leveled), plus more as needed for rolling and work surface
- 1/2 teaspoon baking powder
- 1/4 teaspoon salt
- 3/4 cup (12 Tbsp; 170g) unsalted butter, softened to room temperature
- 3/4 cup (150g) granulated sugar
- 1 large egg, at room temperature
- 2 teaspoons pure vanilla extract
- 1/4 or 1/2 teaspoon almond extract (optional, but makes the flavor outstanding)*
Easy Icing:
- 3 cups (360g) confectioners’ sugar
- 1/2 teaspoon pure vanilla extract (omit and replace with water for stark white icing)
- 2 teaspoons light corn syrup*
- 4.5–5 Tablespoons (67–75ml) room temperature water
- A of pinch salt
- Optional: gel food coloring & sprinkles for decorating
How to Make:
- Make sure you have allotted enough time (and enough counter space!) to make these cookies. The cookie dough needs to chill, the cookies need to cool completely, and the icing needs 24 hours to completely set. If enjoying right away and hardened icing isn’t a concern, you’ll only need about 3–4 hours to make these.
- Make the cookie dough: Whisk the flour, baking powder, and salt together in a medium bowl. Set aside.
- In a large bowl using a handheld or a stand mixer fitted with a paddle attachment, beat the butter and sugar together on high speed until completely smooth and creamy, about 2 minutes. Add the egg, vanilla, and almond extract (if using), and beat on high speed until combined, about 1 minute. Scrape down the sides and up the bottom of the bowl and beat again as needed to combine.
- Add the dry ingredients to the wet ingredients and mix on low until combined. Dough will be a bit soft. If the dough seems too soft and sticky for rolling, add 1 more Tablespoon of flour.
- Divide the dough into 2 equal parts. Place each portion onto a piece of lightly floured parchment paper or a lightly floured silicone baking mat. With a lightly floured rolling pin, roll the dough out to about 1/4-inch thickness. Use more flour if the dough seems too sticky. The rolled-out dough can be any shape, as long as it is evenly 1/4-inch thick.
- Lightly dust one of the rolled-out doughs with flour. Place a piece of parchment on top. (This prevents sticking.) Place the second rolled-out dough on top. Cover with plastic wrap or aluminum foil, then refrigerate for at least 1–2 hours and up to 2 days.
- Once chilled, preheat the oven to 350°F (177°C). Line 2–3 large baking sheets with parchment paper or silicone baking mats. Carefully remove the top dough piece from the refrigerator. If it’s sticking to the bottom, run your hand under it to help remove it. Using a cookie cutter, cut the dough into shapes. Re-roll the remaining dough and continue cutting until all is used. Repeat with a second piece of dough. (Note: It doesn’t seem like a lot of dough, but you get a lot of cookies from the dough scraps you re-roll.)
- Arrange cookies on baking sheets about 3 inches apart. Bake for 11–12 minutes or until lightly browned around the edges. If your oven has hot spots, rotate the baking sheet halfway through bake time. Allow cookies to cool on the baking sheet for 5 minutes, then transfer to a wire rack to cool completely before decorating. No need to cover the cookies as they cool.
- Make the icing: Using a fork, stir the confectioners’ sugar, vanilla, corn syrup, and 4.5 Tablespoons (67ml) of water together in a medium bowl. It will be very thick and almost impossible to stir. Switch to a whisk and whisk in 1/2 Tablespoon (8ml) more of water. If you lift the whisk and let the icing drizzle back into the bowl, the ribbon of icing will hold shape for a few seconds before melting back into the icing. That is when you know it’s the right consistency and is ready to use. If it’s too thick (sometimes it is), whisk in another 1/2 Tablespoon (8ml) of water or a little more until you reach the proper consistency.
- If you’re tinting the icing another color, stir in the food coloring. You can pour some icing into different bowls if using multiple colors. When tinting icing, use only 1–2 drops at first, stir it in, then add more as needed to reach your desired color. Remember, color darkens as icing dries.
- Decorate the cookies: You can dip the cookies into the icing or use squeeze bottles or piping bags (reusable or disposable) fitted with piping tips (I usually use Wilton Piping Tip #4). Decorate your cookies as desired. If using the squeeze bottles or piping tips, I usually outline cookies with icing first, then fill in the middle. If adding sprinkles on top of the icing, add them right after applying icing on your cookie.
- Let icing dry/set: Feel free to enjoy cookies before icing completely dries. Icing dries in 24 hours. No need to cover the decorated cookies as you wait for the icing to set. If it’s helpful, decorate the cookies directly on a baking sheet so you can place the entire baking sheet in the refrigerator to help slightly speed up the icing setting. Once the icing has dried, these cookies are great for gifting or for sending.
- Cover and store decorated cookies for up to 5 days at room temperature or up to 10 days in the refrigerator.